Online guide

CONNECT 2

Register with myLEWITT and get free software.

  • CONNECT 2 - What's included?

    • CONNECT 2 audio interface
    • USB C cable, 1.5 meter
    • USB C to A adapter
    CONNECT 2 内容物
    CONNECT 2 box content
  • CONNECT 2 - Download CONTROL CENTER

    You can download the latest version of CONTROL CENTER, including the latest drivers and firmware, here:

  • CONNECT 2 - Getting started

    Follow these steps to use CONNECT 2 with a computer.

    1. Download LEWITT CONTROL CENTER software.
    2. Connect CONNECT 2 to your desktop or laptop using the supplied USB cable.
    3. Set CONNECT 2 as the default audio device in your system or audio settings.

    That's it! Now you're ready to go.

    What is the CONTROL CENTER?
    The CONTROL CENTER is software for CONNECT 2 that is compatible with Mac and Windows to control the advanced functionality of CONNECT 2 and its features.

  • CONNECT 2 - macOS and Windows compatibility

    CONTROL CENTER runs on both macOS and Windows.

    On macOS, CONNECT 2 doesn't need a separate driver. You can simply plug the device in and start recording.

    On Windows computers, the LEWITT ASIO driver is required for CONNECT 2 to work and to ensure low-latency audio. To download the driver, simply install the CONTROL CENTER software. All drivers will be installed with it.

  • CONNECT 2 - Mobile device & standalone compatibility

    CONNECT 2 is a UAC2 (USB Audio Class 2) device and can be used in standalone mode. It is generally compatible with mobile and other devices supporting UAC2 audio devices.

    iOS devices are compatible with CONNECT 2.

    With Android devices, we do not guarantee compatibility. CONNECT 2 may work with particular devices, but different operating system versions and smartphone manufacturer variations can cause issues.

    In any configuration, CONNECT 2 requires 27W power via USB. This can be provided by devices that supply enough bus power or adapters that can be connected to an external power supply.

    Tip: Devices with USB-C ports generally provide bus power. iPads and iPhones with lightning connections do not provide bus power. Apple recommends the use of a "Camera Connection Kit".

  • CONNECT 2 - How to redeem included software

    To receive your license of Cubase LE, please follow these steps:

    • Create a myLEWITT account
    • Register your product in the gear locker
    • You'll receive a confirmation email with an activation link for Cubase LE
    • Create a Steinberg account and activate your license
    • Download and install your software


    To receive your license of Cubasis LE, please follow these steps:

    • Download the Cubasis LE app from the app store
    • Click "I have supported external hardware" (see picture below)
    • Connect the CONNECT 2 to your iOS device (Some mobile devices require a camera connection kit to connect; see also "Mobile device & standalone compatibility")
    • Cubasis LE is automatically unlocked
    Steinberg
    Steinberg
  • CONNECT 2 - Connections

    CONNECT 2 inputs
    CONNECT 2 inputs
  • CONNECT 2 - User interface (hardware)

    UI
    1. Microphone input channel
    2. Instrument input channel
    3. Loudspeaker output channel
    4. Headphone output channel
    5. Mute and unmute selected input or output channel
    6. Touch wheel to adjust gain and volume level for selected input or output channel
    7. LEDs display metering of selected input or output channels
    8. Displays gain, volume, and mix setting
    9. Custom button executes in CONTROL CENTER selected function
    10. Input/playback mix allows to blend between direct monitoring and computer audio playback
    11. Autogain to setup gain for chosen input
  • CONNECT 2 - User interface (CONTROL CENTER)

    CONTROL CENTER software

    Software UI
    Software UI
    1. Microphone input section
    2. Instrument input section
    3. Loopback
    4. Loudspeaker output section
    5. Headphone output section
    6. Input/playback mix section
    7. Low-cut filter
    8. 48V phantom power
    9. Clipguard
    10. Gain
    11. Autogain
    12. Preamp characteristics
    13. Denoise
    14. Comp
    15. MUTE channel
    16. Metering
    17. Volume controls
    18. Direct monitoring input selection
    19. Autosetup for input channels
    20. Sample rate
    21. Settings panel
    22. Dim output signal
    23. Mono output signal


    CONTROL CENTER settings

    Settings UI
    Settings UI
    1. Audio configurations (gain lock, streaming modes, high impedance headphones mode, high volume speakers mode, input/playback mix applies to speakers)
    2. LED brightness and colors
    3. Custom button function selection
    4. CONTROL CENTER and CONNECT 2 firmware version
    5. Update CONTROL CENTER and CONNECT 2 firmware version
    6. Manually update CONTROL CENTER and CONNECT 2 firmware version
    7. Factory reset all settings, including colors
  • CONNECT 2 - Custom button

    CONNECT 2 lets you assign different functions to the custom button. The options can be found in CONTROL CENTER - Settings - Custom button. 

    CONNECT 2 custom button settings

    List of functions:

    • Show CONTROL CENTER (brings the already open CONTROL CENTER to the front)
    • Toggle mic preamp styles
    • Toggle instrument preamp styles
    • Toggle output mute states (mutes headphones, unmutes speakers - unmutes headphones, mutes speakers)
    • Toggle output mute states + mic (Mutes headphones and microphone, unmutes speakers - unmutes headphones and microphone, mutes speakers)
    • Dim outputs
    • Mono/stereo outputs
    • Toggle brightness settings
       

    If the selected function results in a single action, the LED ring will light up briefly (e.g. toggle monitors). If your selected function results in an active state (e.g. DIM outputs) the custom button icon will stay dimly lit. 

  • CONNECT 2 - Autosetup & Autogain

    CONNECT 2 auto setup

    1. Autosetup

    Autosetup

    Autosetup can be activated in CONTROL CENTER in the top left corner. 

    Autosetup helps to find the right settings for your input channels, including 48V, low-cut filter, preamp characteristics, Denoise, Compressor, and Clipguard settings.

    2. Autogain

    Autogain

    Autogain sets the right gain setting for your input channels. 

    1. To start Autogain on the hardware user interface, press the Autogain button in the center
    2. Now, press the input channel you want to set up the gain for
    3. The microphone and instrument input can be chosen individually or simultaneously
    4. Confirm your selection by pressing the autogain button again
    5. A timer will start, indicated on the LED wheel
    6. Give a reference performance during this period
    7. When finished, the LED wheel blinks green, and your gain is set accordingly.
    8. If you see the LED wheel blink red, something went wrong. In this case, try the Autogain process again.
  • CONNECT 2 - Clipguard

    Clipguard

    Image removed.

    Clipguard can be activated in the CONTROL CENTER indicated by the Clipguard symbol.

    It protects input signals from distortion and clipping. Your signal will remain clean no matter how loud you scream or perform.

    Disable Clipguard if you want to record in the highest possible dynamic range.

    Clipguard

  • CONNECT 2 - Preamp characteristics

    Use three iconic DSP-based preamp characteristics to find your perfect tone easily. Available for microphone and instrument input channel.

    Preamp characteristics

    Clean gives you unparalleled clarity and fidelity. Perfect if you want to process your signal further later on. 

    Warm provides a vintage vibe with smooth highs and an overall sound characteristic that resembles iconic tube gear.

    Vivid brings even your dullest-sounding microphone alive and adds sparkle and articulation to your sound.

  • CONNECT 2 - Denoise & Comp

    Denoise removes unwanted background noise and hums from the input signal while maintaining your natural sound.

    Activate the Denoiser (Denoise) in the CONTROL CENTER, and the noise floor measurement starts.

    Depending on the selected input and connected hardware, noise is removed, for example, environment noise on microphones or static hum on electronic guitars using an expander.

    This process must be repeated when the environment or microphones/instruments are changed. 

    Comp is a compressor and ensures controlled dynamics of the input signal by optimizing the range of loud and quiet parts, enhancing audibility. 

    To assist you in determining the ideal gain level to use with Denoise and Comp, use the Autogain and Autosetup functions.

    Please note: Denoise & Comp are not available when recording in 96 kHz.

  • CONNECT 2 - Channel routing

    Audio can be routed to and from the CONNECT 2 via your DAW and other third-party programs. For reference, see the software channel matrix below.

      CONNECT 2 inputs CONNECT 2 outputs
    1 Microphone Output L
    2 Instrument Output R
    3 Loopback L  
    4 Loopback R  


  • CONNECT 2 - Loopback

    With Loopback, internal audio from your computer is routed back into the inputs of your interface. Easily record samples, Zoom calls, create streaming setups or play along with your favorite YouTuber. Everything you play back on Output L/R can be used as Input in a DAW, streaming platform, or any other third-party application.

    By default, these channels are routed to Input 3/4 on the CONNECT 2.

      CONNECT 2 inputs CONNECT 2 outputs
    1 Microphone Output L
    2 Instrument Output R
    3 Loopback L  
    4 Loopback R  


    Tip: Do NOT actively monitor the Loopback channels. This will result in a feedback loop.
     

  • CONNECT 2 - Mobile & macOS streaming modes

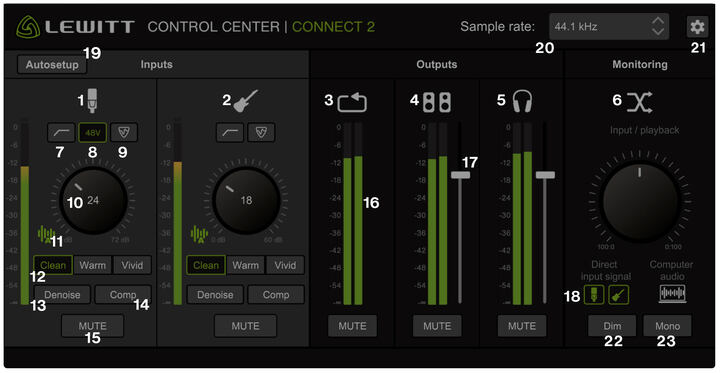
    CONNECT 2 provides two streaming modes to optimize your streaming process for any platform and workflow.

    1. Mobile streaming mode


    When you should use this mode

    Third-party mobile phone applications might choose channel 1 as your only audio source, preventing you from streaming your instrument input.
    On other occasions, third-party mobile phone applications might choose channel 1/2 as an L/R stereo stream, which results in a hard left-panned microphone and a hard right-panned instrument. Choose this mode to avoid either of these problems.

    How to use this mode

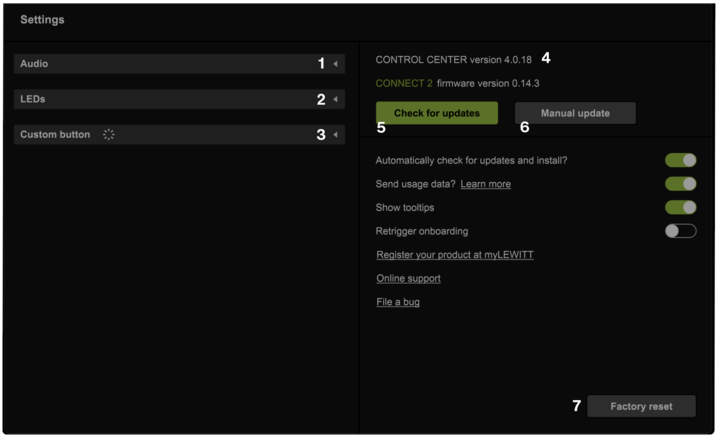
    Turn on the "Mobile streaming mode" in CONTROL CENTER - Settings - Audio. This will output the Microphone and Instrument on Input channels 1 and 2 mixed.  

    Your device will effectively carry the following signals:

      CONNECT 2 input CONNECT 2 output
    1 Microphone/ Instrument Output L
    2 Microphone/ Instrument Output R
    3 Loopback L  
    4 Loopback R  


    2. macOS streaming mode


    When you should use this mode

    On macOS, OBS and other third-party programs might prevent you from selecting a dedicated input. This would make it impossible to utilize the loopback channel to stream computer audio.
    If you want to stream microphone, instrument, and computer audio, monitor the microphone and instrument input actively in a DAW. This will effectively include them in the loopback stream. With this mode enabled, you can use the Loopback channels as input in any software.

    How to use this mode

    Turn on the "macOS streaming mode" in CONTROL CENTER - Settings - Audio. This will switch your Loopback L/R channels to software inputs 1/2. 

    Your device will reboot with the following channel routing:
     

      CONNECT 2 input CONNECT 2 output
    1 Loopback L Output L
    2 Loopback R Output R
    3 Microphone  
    4 Instrument  
  • CONNECT 2 - Direct monitoring control

    Output signals are sent to the loudspeakers and headphones. You can control and mute their volume independently via the local hardware interface and in CONTROL CENTER.

    The Input/playback control in the monitoring section lets you blend between the direct input signal and the computer audio at any ratio for low-latency monitoring.

    100% left gives you 100% direct monitoring. 100% right gives you 100% playback (computer) audio.

    In CONTROL CENTER, you can select if you want to monitor the microphone and instrument inputs on their own or together.

    To avoid unwanted feedback, the direct monitoring on loudspeakers is deactivated by default. You can turn it on in CONTROL CENTER - Settings - Audio - "Input/playback mix applies to speakers".

    Tip: Do not activate monitoring on third-party software and input monitoring on the same source simultaneously to avoid a duplicate, time-delayed signal. 

    CONTROL CENTER
    CONTROL CENTER
  • CONNECT 2 - Mute button and panic mute

    Press MUTE on the hardware interface of CONNECT 2 to mute and unmute any selected channel.

    If another channel is selected, a muted channel will stay dimly lit in the MUTE color (factory set to red).

    Additionally, there is a PANIC MUTE functionality for stressful situations when you want to mute everything quickly.

    • Long-press the MUTE button on your hardware UI to mute all inputs and outputs.

    To deactivate the MUTE status, you need to unmute each channel individually.

  • CONNECT 2 - Gain settings from 3rd party apps

    CONNECT 2 can be seamlessly integrated with third-party applications. For example, you can adjust the gain for the input channels directly from the DAW in Logic Pro.

    Some third-party programs, like Microsoft Teams, may access the gain control in unwanted ways. To disable such behavior, activate “External gain lock” in CONTROL CENTER - Settings - Audio.
     

  • CONNECT 2 - Showcase mode

    CONNECT 2 is the perfect audio interface to showcase microphones on a trade show floor, so we included a hidden "Showcase mode". If you are a dealer or store manager and want to use CONNECT 2 in this way as well, this function might be helpful to you.

    This mode locks all functions except the headphone volume. Simply set up the correct gain for the microphone and then engage the showcase mode. Then, the only thing users can change is the headphone volume. 

    Press icons in the following order to access and exit the showcase mode:

    2x Microphone + 2x Instrument + 2xLoudspeaker + 2x Headphone

    CONNECT 2 will blink once if it is successful.

  • CONNECT 2 - Firmware updates and new features

    Firmware updates are automatically distributed via the CONTROL CENTER. 

    You can find the latest firmware version in the settings panel under "Updates and maintenance".

    If you want to find out more details about releases and updates, click here.

    If you receive the following error message after the firmware installation process, please simply power cycle your CONNECT 2 once by unplugging the interface and plugging it back into your computer.

    Error message
    Error message
  • CONNECT 2 - macOS Sonoma mic modes

    The newly introduced "Mic Mode" feature in macOS Sonoma (e.g., Voice Isolation) can cause problems with the audio signal.

    Set the "Mic Mode" to "Standard" to guarantee the best quality for your recordings.

    mic modes

You can learn more about your product, download files, and check specs.

Need help?

Contact us

Write an email or send us a direct message

Contact us

Blog and reviews

Learn and get inspired.

Facebook icon YouTube icon Instagram icon zoom-icon